Check out Monstera Pinnatipartita Growing and Care Guide with easy-to-follow tips and improve the health and beauty of this beautiful plant.
Find comprehensive instructions on Monstera Pinnatipartita Growing and Care Guide, ensuring its optimal growth and well-being.
Monstera Pinnatipartita Profile

Monstera pinnatipartita, a striking epiphytic plant, can be found naturally in the lush tropical rainforests of Colombia, Peru, and Ecuador.
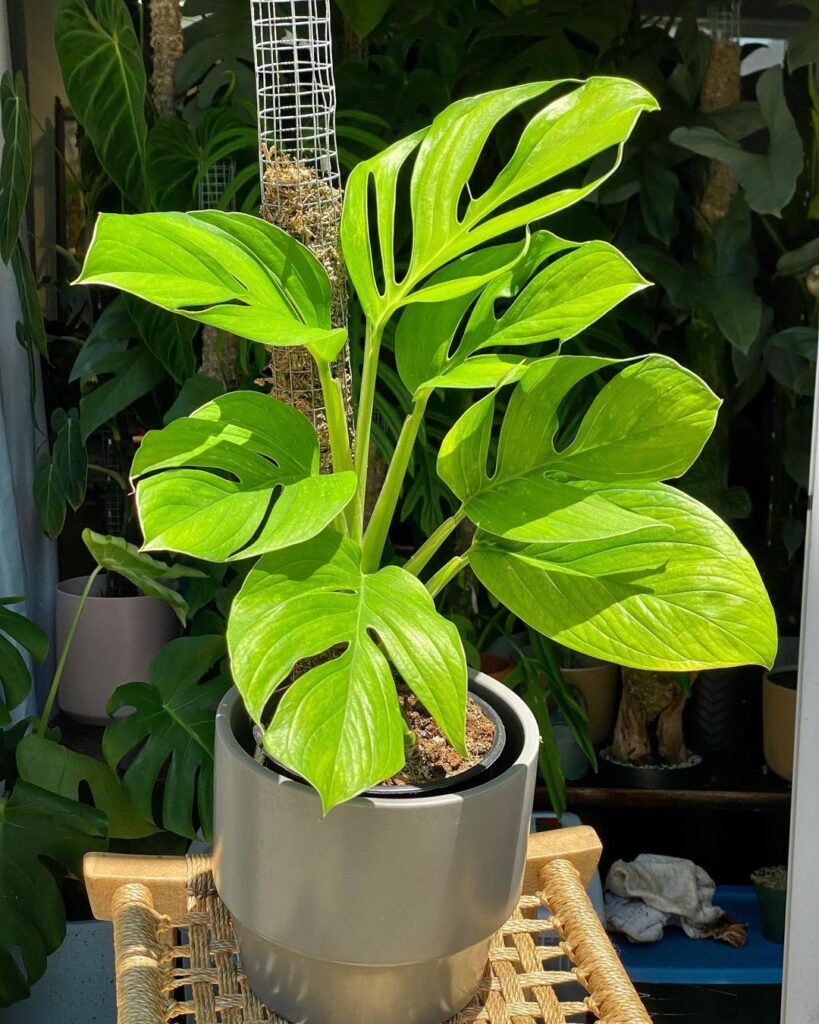
What distinguishes this uncommon species is its exceptional fenestration, which extends higher up the dark green, heart-shaped leaves compared to more commonly seen monstera varieties. Despite their captivating presence, these plants are surprisingly straightforward to care for.
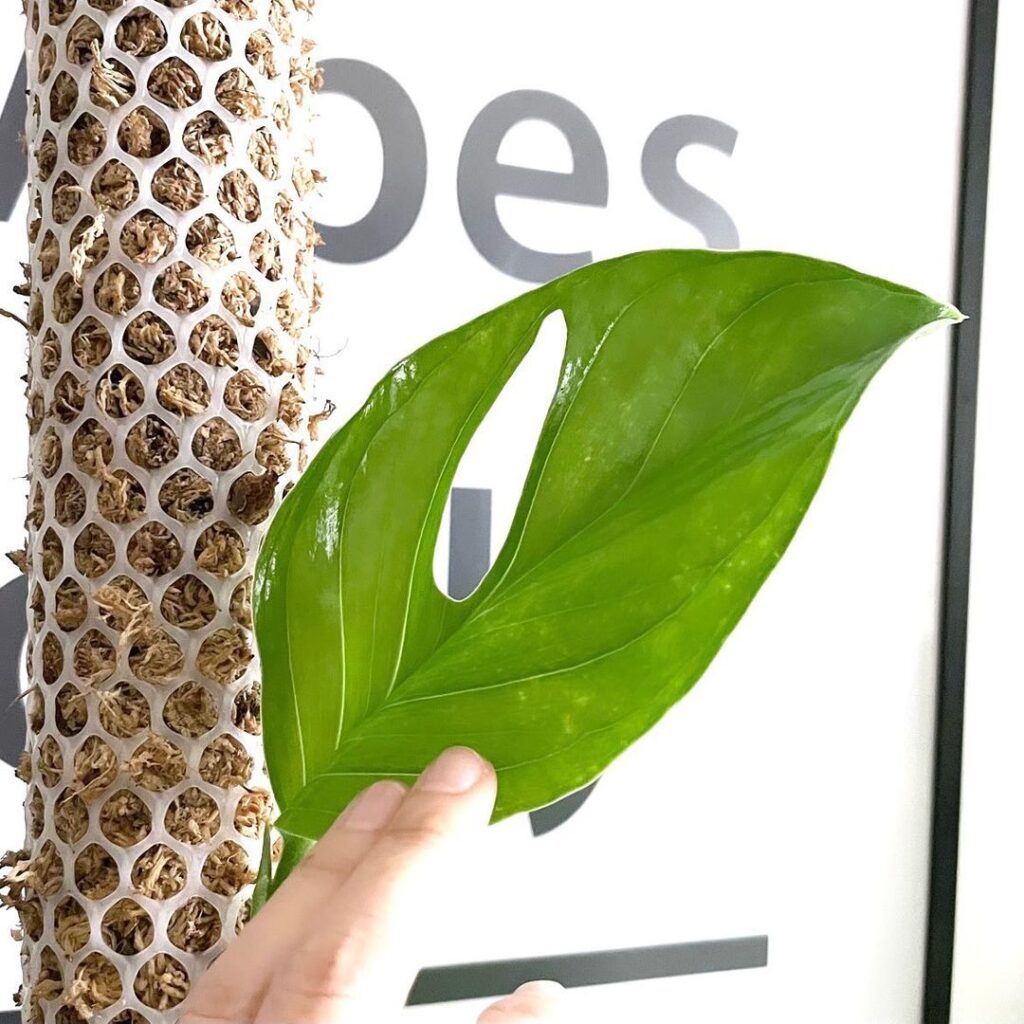
Mature Monstera pinnatipartita plants have impressive-looking leaves with lots of fenestration. But when they’re young, the leaves are solid and don’t have those holes. So, if you get a young plant, you’ll have to wait a while for it to look like that.
Despite its captivating appearance, this plant is relatively low-maintenance, making it an ideal choice for beginner houseplant enthusiasts and monstera admirers alike.
Check Philodendron Fuzzy Petiole Growing and Care Guide
Propagating Monstera Pinnatipartita
How to Grow in Soil
- Use sterile shears and carefully cut a 4- to 6-inch section of the stem, making the cut about a half-inch below a leaf node.
- Remove any foliage that remains on the lower third of the cutting.
- Dip the cut end of the stem into a rooting hormone to encourage root development.
- Prepare a container with good drainage holes and fill it with a moist and loose soilless growing medium.
- Gently insert the cutting into the growing medium, ensuring that it is stable and upright.
- Place the container in a location with bright but indirect light.
- Avoid direct sunlight as it may damage the cutting.
- Maintain the moisture of the potting mix by watering it enough to keep it moist, but avoid saturating it.
- Overwatering can lead to rot.
- After two to three months, check for the presence of well-formed roots.
- Carefully dig around the base of the cutting to inspect the root development.
- Once the cutting has developed a healthy root system, you can transfer it to a larger pot to provide more space for growth.
How to Grow in Water
Use sterile shears and carefully cut a 4- to 6-inch section of the stem, making the cut about a half-inch below a leaf node. Fill a tall, clear glass container with water and place the cutting in it. Ensure that only the cut end of the stem is submerged in water while keeping the leaves above the surface of the water. Position the glass container in a bright area, away from direct sunlight.
Indirect sunlight provides the necessary light without causing harm to the cutting. Replace the water in the glass container with fresh water on a weekly basis to maintain its cleanliness and oxygen levels. Allow the cutting to remain in the water for up to two months or until the roots have grown to be at least an inch long. Once the roots have developed sufficiently, the cutting can be planted in the soil.
Propagate by Air Layering
- Select a healthy stem with a leaf and ensure it has at least one intact node.
- With sterile shears, create a small notch in the stem just below the node. Take care not to cut more than 1/4 inch deep.
- Prepare a plastic bag with small holes punched in the bottom and fill it with moist sphagnum moss.
- Cut the top end of the bag to create flaps that can be wrapped around the stem.
- Press the moss against the node and wrap the bag flaps around the stem.
- Secure the bag in place using cable ties or string, ensuring that the node section is fully enclosed in the bag with the moss pressed against it.
- Monitor the moisture level of the moss and spray it if it begins to dry out. Avoid over-soaking.
- Keep an eye on the stem for the growth of roots. This process may take up to two months.
- Once the roots have reached a length of at least one inch, carefully remove the bag.
- Cut off the rooted stem and prepare to plant it in a potting medium of your choice.
Check Boobie Cactus Care Guide
Ideal Growing Conditions for Monstera Pinnatipartita
Location
To ensure healthy foliage and proper fenestration, place your Monstera pinnatipartita in a well-lit area with indirect light. Avoid direct sunlight to prevent leaf scorching. Consider supplemental grow lights for north-facing locations. Rotate the pot regularly for even light exposure.
Soil
For optimal growth, avoid using dense soil for your Monstera pinnatipartita. Instead, opt for a light and well-aerated mix that includes nutrient-rich organic material. Blending vermiculite, orchid bark, and sustainable coco coir is recommended. Alternatively, you can find ready-made monstera or aroid mixes that provide a balance of drainage and moisture retention. Using a moss pole can also allow the plant to draw nutrients from it.
Water
For a healthy Monstera pinnatipartita, keep the soil evenly moist but not soggy to avoid root rot. Water when the top few inches of soil are dry and ensure good drainage. Water every one to two weeks during the growing season, adjusting based on humidity.
Temperature and Humidity
Monstera pinnatipartitas thrive in warm and humid conditions, just like their tropical rainforest origins. Keep temperatures between 65 and 85 F, and avoid exposing them to drafts or direct heat from vents. Higher temperatures promote faster growth and more impressive fenestration.
To prevent dry, curling leaves, maintain humidity levels above 50% for your Monstera pinnatipartita. Consider placing it in a steamy bathroom or using a humidifier. Grouping it with other humidity-loving plants can also help.
Monstera pinnatipartita Care
Fertilizer
Regular feeding during the spring and summer seasons enhances leaf development for your Monstera pinnatipartita. Use a slow-release balanced 20-20-20 liquid fertilizer, ideally designed for monstera plants. Reduce feeding to once a month or less during the slower winter months.
Pruning
To spruce up untidy aerial roots, you can trim them or tuck them back into the pot. Remove unhealthy leaves to redirect energy towards healthy foliage. If the plant becomes too tall for your space, trim it back in spring using sterile cutting shears. Limit the trimming to a maximum of 25% of the plant’s height.
Repotting
For mature Monstera pinnatipartita plants, repotting every one to two years can be beneficial. Choose the spring season before the major growth spurt for repotting. Select a pot that is approximately 3 inches wider than the root ball and ensure it has good drainage holes.
Pests and Diseases
To maintain healthy foliage and prevent pest infestations, regularly wipe the leaves of your Monstera pinnatipartita with a damp cloth to remove dust and keep them glossy. Mealybugs and spider mites can be common issues, but you can address them by applying neem oil or insecticidal soap before the infestation becomes severe.
Toxicity
Monstera pinnatipartita is not a good choice if you have pets that like to chew on plants. These plants have something called insoluble calcium oxalates, which can harm pets if they eat them. So be careful if you have pets around these plants.